5 quick Nail Arts in under 5 minutes

Festivities are in full swing and with just 2 days left for Diwali, here are 5 super quick nail arts to prettify your nails.

If you are not into nail art, HERE are my top 5 picks for nailpolish shades to wear.

** Click on the image to view full post**


  1. Polka dots


2. Crackle nails


3. Glitter top coat


4. Bows & Dots


5. Gradient


If you recreate these nail arts, do tag me

My Instagram handle is blossom_2507

Facebook: https://www.facebook.com/InsaneDissections/?ref=br_rs

xoxo, Blossom


Tutorial: Floral Nails #2

It has been a ages since I last did a tutorial. So I am back with a super simple tutorial for Floral nail art.

I am thinking of posting more nail arts on the blog.

I have done other Floral nail arts HERE and HERE.

You can check part #1 of Floral nails tutorials HERE

So, let’s begin with this nail art


Things you need:

  • Base nail paint 

I used NYC In a minute quick dry nail polish – Blanco 032

Make sure to choose a quick drying one. I made a blunder of not choosing a quick drying one and ended up with untidy design 😦

  • Nailpaints for flowers

You can choose whichever shade you like. I used Nykaa Neon Matte in shades Cherry Pop (Orange) and Pink Lemonade (Pink).

See the proper swatch of these nail polish HERE.


  • Green nailpaint for leaves

I did not have a proper green color, so I had to make do with this pastel mint green nailpolish by Note (shade: 71 Mint)


  • Toothpick!

Thats’s it.


Steps for an awesome Floral Nail art

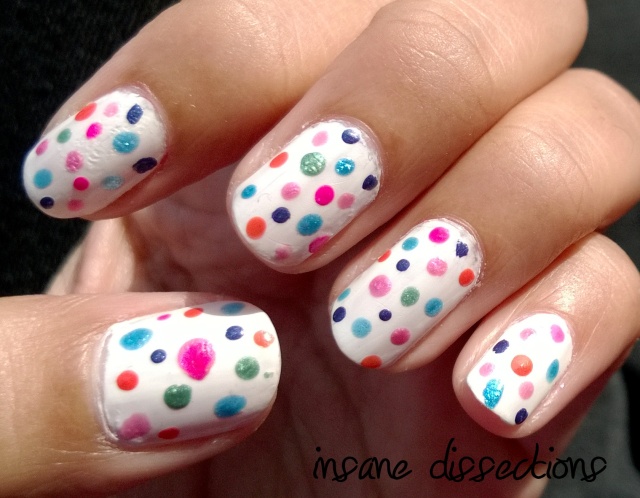
  1. Paint the base color of your choice. I chose white as it is a perfect canvas for any nail art .

    Check out some amazing nail arts I did using White base HERE


2. Using back of the toothpick place random colorful dots on the nails. Make sure not to dot too closely.


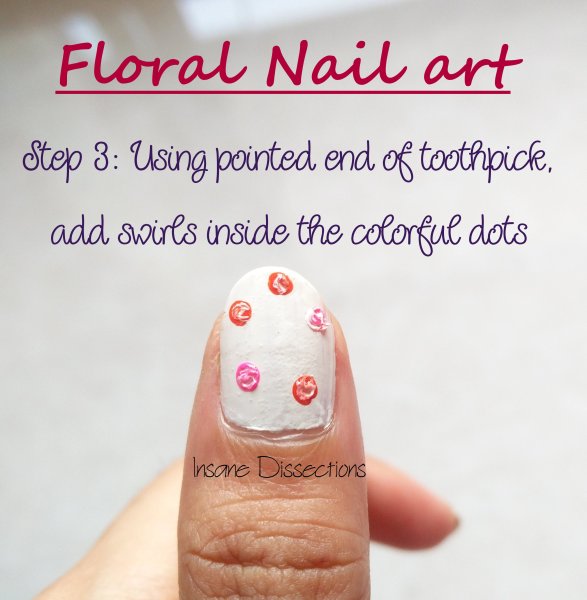
3. Using the pointed end of the toothpick, pick up some white nailpolish and draw swirls inside the colorful dots you painted.

(I know mine looks bad. Blame the crappy white nailpolish I used)


4. Using the pointed end of another toothpick, pick up green nailpolish and add random short lines around the colorful dots. This will make the leaves.


5. Seal with a top coat. Tadaaa!


Hope you find this useful.

Do tag me if you recreate this nail art. I would love to see it.

My Instagram handle is blossom_2507

Facebook: https://www.facebook.com/InsaneDissections/?ref=br_rs


xoxo, Blossom 🙂


Golden Polka Dots nail art


It has been a while since I last posted Nail art. I had the pics of this nail art lying and I thought to put it to better use 😛

I love polka dots nail art as they are easiest to do without much effort and look the funkiest. I have done other Polka dots nail art. Do check it HERE, HERE, HERE and HERE.

This is one super simple nail art and all you need is a bobby pin/ toothpick/ dotting tool and nailpolish of your choice.

I clicked the pics after 2-3 days I did the nail art that is why you can see tip wear on my nails.

I have used Maybelline Colorshow nailpolish in shade Bold Gold.


Do tag me if you recreate this nail art.

My Instagram handle is blossom_2507

Facebook: https://www.facebook.com/InsaneDissections/?ref=br_rs


xoxo, Blossom

Zig-Zag Nail Art

zig zag nail art


It has been a long time since I last posted a nail art, and so here I am posting a nail art which has been sitting quietly for many many months in a forgotten folder somewhere in my computer. (Eeeeee!)

This was supposed to be a color block nail art of pink and yellow, but then I added a zig zag line (just like that) with a nail art pen.

My nail art pen went gloopy, that is why there are random black lines here and there :-/

See my other super easy color-block nail art HERE & HERE


pink yellow nail art


zig zag pink nails


zig zag nail art


Hope you like it 🙂


Xoxo

Blossom

Color Block Nail art

colorful nail art

Hi everyone

First of all… Happy newww year 🙂  I know I am almost a month late in wishing but better late than never, right?

So I thought of starting with this year on a rather colorful note. So here it is- *drumrolls* The Color Block nail art 

Actually I did this nail art long back but somehow never posted it here. This nail art is inspired from the pic HERE. I kept the color combinations same as this is a vibrant combination and I wanted to keep it bright and colorful.

colorblock nails


 This is a very simple nail art. All you need is a few colorful nailpolish, a black polish and a striping brush.

And if you don’t have a striping brush just grab an old nailpolish brush and trim it with scissors. You can also use a nail art pen if you have one.

You don’t have to be perfect while applying the basic colors. The black outline will hide the imperfect boundaries of the different colors 🙂


color block nail art

I have done color block nail art before as well.. check it HERE.


colorful nails

Nailpolishes used:

Red:  Colorbar Pro Nail Lacquer – Rosie

Mint:  Maybelline colorama – Absinto

Yellow:  Flormar Supershine – 41 (also used in THIS nailart)


xoxo

Blossom


Movember Moustache nail art

moustache nails

Can’t believe its November already. This year went by so fast (well this is a recurring dialogue every year, I know :D). But seriously, it feels like- where did the time fly? For me the starting of winters always have mixed feelings- the happiness for the onset of my favorite season, and the sadness for another year going so fast. Don’t you ever feel we are growing so fast. Wish there was a slow down button in life as well. *Sigh*

Anyhoo, since November is here and it is also the month for raising  awareness of men’s health issues (or Movember, as it is called), I did a nail art for same. Movember (Moustache + November) is the time when men from all over the world grow facial hair in attempt to raise charity for men’s health awareness- particularly prostate and testicular cancer. Read more about it HERE.
Actually I did not intend to make this a Movember nail art. I only painted my nails with yellow nail polish. And I couldn’t resist drawing little smileys on it. I accented it a little with moustache on ring finger. That is how I came up with this Movember nail art.
Pssst, I have done another Smiley nail art HERE.
moustache nail art
 Pretty smileys 🙂
smiley moustache nail art
 Moustache nail art
smiley nails
 Smiling nails
smiley moustache nail art
 Movember nail art
moustache nails 2
I am not among the girls who paint their left hand (non dominant hand) prettily and keep the poor right hand nails tattered and ignored (Yes girls in metro- flashing their pretty and well groomed left hand nails happily- I’m talking to you!). I never keep my right hand nails bare. I ALWAYS paint both hands, no matter it ends up looking wee bit untidy. And this is how it looked with this nail art.
moustache smiley nails
I know the moustache looks weird okay, but still I managed to make it look like a moustache 😛
Don’t you think it looks like the moustache of old rural people who keep their moustache long and groomed.
smiley nail art
Smileys made using a nail art pen.
XOXO
Blossom

10 Super easy Nail art for Halloween

Hey guys

Happy Halloweeeeeen! This halloween I tell you some nail art designs which you can do even in a hurry while you are dressing up for Halloween parties. They are simple and even a beginner can try it.

1. Mummy nail art:

Draw some random lines using black polish. Draw a thicker strip of black and paint eyes over it. For eyes first make white dots and then draw smaller dot of red on it.

halloween nail art mummy


source

2. Bloodshot Eye nail art:

Paint a big dot of blue. Place a black dot inside the blue. Make random lines of red for veins.

Source

3. Wound nail art:

Draw few thick lines using red nailpolish and cross them with black using thin lines.

halloween nails


Source

4. Colorful ghosts nail art:

For eyes, place a few dots closely to make a flower kind of shape and add black and white dot on it. Dot the cheeks and nose. Make mouth and teeth using thin lines.

Source

5. Skull nail art:

Source

6. Ghost nail art:

Paint globs of black for eyes and nose. Add stripes for teeth.

Hallowe'en Nail Art Tutorial Skull Nails

Source

7. Reptile eyes nail art:

Source

8. Ghoul nail art:

Paint 2 dots for eyes and uneven stroke of black for mouth.

nrm_1414445550-cosmo-social-ghoul-mani-how-to


Source

9. Dripping blood nail art

Halloween nail art - Dripping blood

Source

10. Stitch nail art:

Source

Hope you have fun this Halloween 🙂

xoxo

Blossom